Examples
Here you can find a collection of examples.
Keras Framework
Keras: ResNet50 - C&W2 Benchmarking
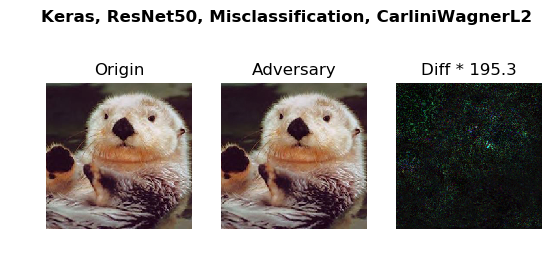
This example benchmarks the robustness of ResNet50 model against \(C\&W_2\) attack by measuring the minimal required \(L_\infty\) perturbation for a \(C\&W_2\) attack to success. You can find the example in the file example/keras_cw_example.py. Run the example with command python example/keras_cw_example.py
from __future__ import absolute_import

import numpy as np
import keras.applications as models
from perceptron.models.classification.keras import KerasModel
from perceptron.utils.image import imagenet_example
from perceptron.benchmarks.carlini_wagner import CarliniWagnerL2Metric
from perceptron.utils.criteria.classification import Misclassification

# instantiate the model from keras applications
resnet50 = models.ResNet50(weights='imagenet')

# initialize the KerasModel
preprocessing = (np.array([104, 116, 123]), 1)  # the mean and stv of the whole dataset
kmodel = KerasModel(resnet50, bounds=(0, 255), preprocessing=preprocessing)

# get source image and label
# the model expects values in [0, 255], and channles_last
image, _ = imagenet_example(data_format='channels_last')
label = np.argmax(kmodel.predictions(image))
metric = CarliniWagnerL2Metric(kmodel, criterion=Misclassification())
adversary = metric(image, label, unpack=False)
By running the file examples/keras_cw_example.py, you will get the following output:

The command line tool perceptron/launcher.py provide users a way to play different combinations of frameworks and models without writing code. For example, the following command line serves the same purpose as above example.
python perceptron/launcher.py \
        --framework keras \
        --model resnet50 \
        --criteria misclassification \
        --metric carlini_wagner_l2 \
        --image example.png
Keras: YOLOv3 - C&W2 Benchmarking (Object detection)
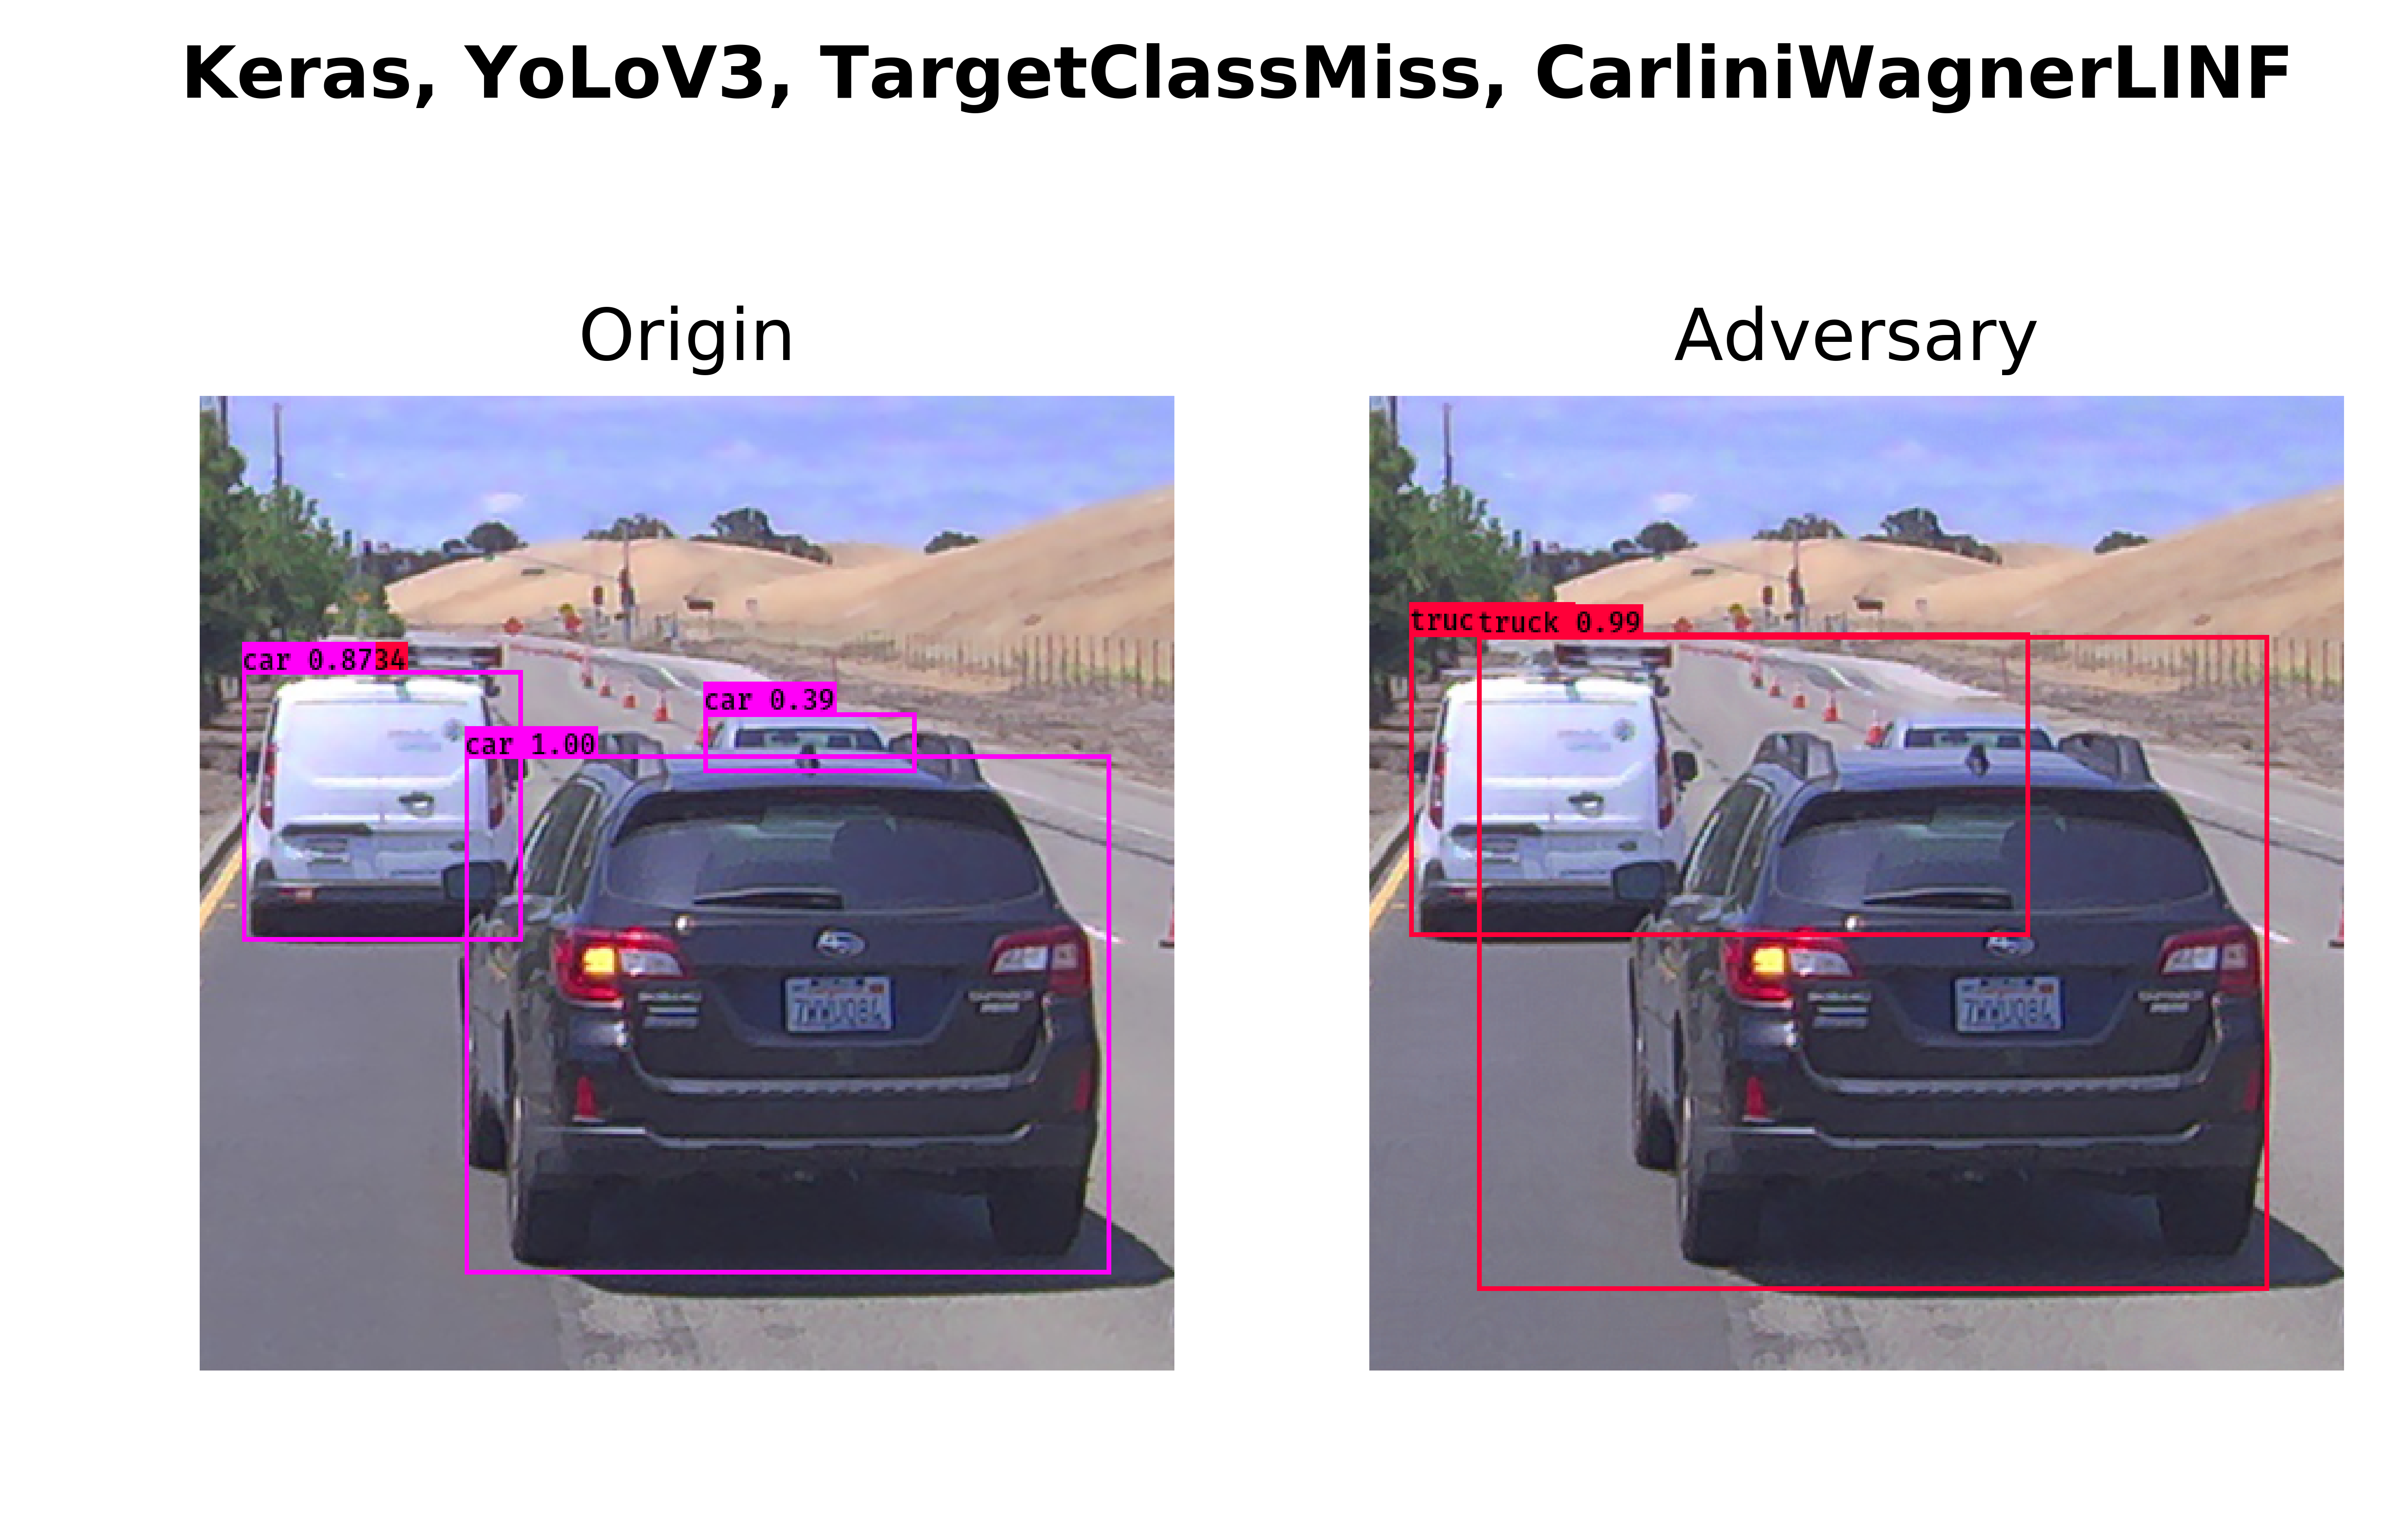
This example benchmarks the robustness of YOLOv3 model (the state-of-the-art object detection model) against \(C\&W_2\) attack by measuring the minimal required \(L_\infty\) perturbation for a \(C\&W_2\) attack to success. The minimum Mean Squred Distance (MSE) will be logged. You can find the example in the file example/keras_cw_yolo_example.py. Run the example with command python example/keras_cw_yolo_example.py
from perceptron.zoo.yolov3.model import YOLOv3
from perceptron.models.detection.keras_yolov3 import KerasYOLOv3Model
from perceptron.utils.image import load_image
from perceptron.benchmarks.carlini_wagner import CarliniWagnerLinfMetric
from perceptron.utils.criteria.detection import TargetClassMiss

# instantiate the model from keras applications
yolov3 = YOLOv3()

# initialize the KerasYOLOv3Model
kmodel = KerasYOLOv3Model(yolov3, bounds=(0, 1))

# get source image and label
# the model expects values in [0, 1], and channles_last
image = load_image(shape=(416, 416), bounds=(0, 1), fname='car.png')
metric = CarliniWagnerLinfMetric(kmodel, criterion=TargetClassMiss(2))
adversary = metric(image, binary_search_steps=1, unpack=False)
The object detection results for the original image and the adversarial one is shown as follows.
In the following, we provide a command line which serves the same purpose as above piece of code.
python perceptron/launcher.py \
        --framework keras \
        --model yolo_v3 \
        --criteria target_class_miss --target_class 2 \
        --metric carlini_wagner_linf \
        --image car.png
The command line tool perceptron/launcher.py allows users to try different combinations of framework, model, criteria, metric and image without writing detailed code. In the following, we provide more API examples and their corresponding command lines.
Keras: VGG16 - Blended Uniform Noise
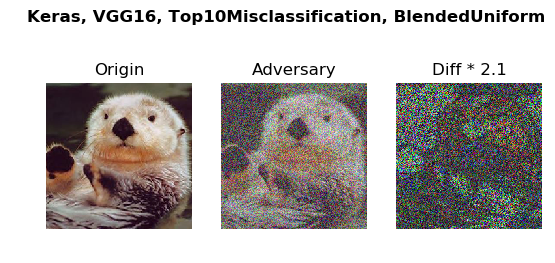
In this example, we try different model and metric. Besides, we choose TopKMisclassification. The \(K\) equals to 10 in this example. It means we want to generate an adversary whose predicted label is not among the top 10 highest possible predictions.
import numpy as np
import keras.applications as models
from perceptron.models.classification.keras import KerasModel
from perceptron.utils.image import imagenet_example
from perceptron.benchmarks.blended_noise import BlendedUniformNoiseMetric
from perceptron.utils.criteria.classification import TopKMisclassification

# instantiate the model from keras applications
vgg16 = models.VGG16(weights='imagenet')

# initialize the KerasModel
# keras vgg16 has input bound (0, 255)
preprocessing = (np.array([104, 116, 123]), 1)  # the mean and stv of the whole dataset
kmodel = KerasModel(vgg16, bounds=(0, 255), preprocessing=preprocessing)

# get source image and label
# the model expects values in [0, 255], and channles_last
image, _ = imagenet_example(data_format='channels_last')
label = np.argmax(kmodel.predictions(image))
metric = BlendedUniformNoiseMetric(kmodel, criterion=TopKMisclassification(10))
adversary = metric(image, label, unpack=False, epsilons=100)  # choose 100 different epsilon values in [0, 1]
The corresponding command line is
python perceptron/launcher.py \
        --framework keras \
        --model vgg16 \
        --criteria topk_misclassification \
        --metric blend_uniform_noise \
        --image example.png
By running the example file examples/keras_bu_example.py, you will get the output as follows.

Keras: Xception - Additive Gaussion Noise
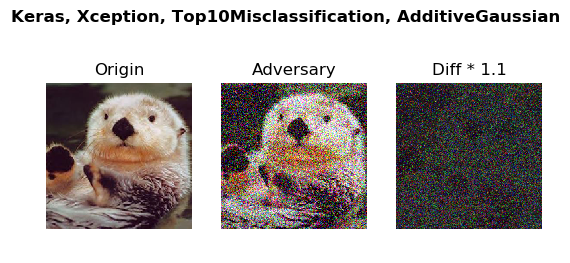
In this example, we show the performance of model Xception under the metric Additive Gaussian Noise.
import numpy as np
import keras.applications as models
from perceptron.models.classification.keras import KerasModel
from perceptron.utils.image import imagenet_example
from perceptron.benchmarks.additive_noise import AdditiveGaussianNoiseMetric
from perceptron.utils.criteria.classification import TopKMisclassification

# instantiate the model from keras applications
xception = models.Xception(weights='imagenet')

# initialize the KerasModel
# keras xception has input bound (0, 1)
mean = np.array([0.485, 0.456, 0.406]).reshape((1, 1, 3))
std = np.array([0.229, 0.224, 0.225]).reshape((1, 1, 3))
kmodel = KerasModel(xception, bounds=(0, 1), preprocessing=(mean, std))

# get source image and label
# the model Xception expects values in [0, 1] with shape (299, 299), and channles_last
image, _ = imagenet_example(shape=(299, 299), data_format='channels_last')
image /= 255.0
label = np.argmax(kmodel.predictions(image))
metric = AdditiveGaussianNoiseMetric(kmodel, criterion=TopKMisclassification(10))
adversary = metric(image, label, unpack=False, epsilons=1000)  # choose 1000 different epsilon values in [0, 1]
The corresponding command line is:
python perceptron/launcher.py \
        --framework keras \
        --model xception \
        --criteria topk_misclassification \
        --metric additive_gaussian_noise \
        --image example.png
By runnig the corresponding example file examples/keras_ag_example.py, you will get the following output.

PyTorch Framework
Note: for the pytorch model, the range of the input image is always in \([0, 1]\).
PyTorch: ResNet18 - C&W Benchmarking
This example verifies the robustness of ResNet18 model against \(C\&W_2\) by measuring the required \(L_2\) pertubutation for a \(C\&W_2\) attack to success. The example with more details can be found in the file example/torch_cw_example.py.
import torch
import torchvision.models as models
import numpy as np
from perceptron.models.classification.pytorch import PyTorchModel
from perceptron.utils.image import imagenet_example
from perceptron.benchmarks.carlini_wagner import CarliniWagnerL2Metric
from perceptron.utils.criteria.classification import Misclassification

# instantiate the model
resnet18 = models.resnet18(pretrained=True).eval()
if torch.cuda.is_available():
    resnet18 = resnet18.cuda()

# initialize the PyTorchModel
mean = np.array([0.485, 0.456, 0.406]).reshape((3, 1, 1))
std = np.array([0.229, 0.224, 0.225]).reshape((3, 1, 1))
fmodel = PyTorchModel(
    resnet18, bounds=(0, 1), num_classes=1000, preprocessing=(mean, std))

# get source image and label
image, label = imagenet_example(data_format='channels_first')
image = image / 255.  # because our model expects values in [0, 1]
metric = CarliniWagnerL2Metric(fmodel, criterion=Misclassification())
adversary = metric(image, label, unpack=False)
The corresponding command line is
python perceptron/launcher.py \
        --framework pytorch \
        --model resnet18 \
        --criteria misclassification \
        --metric carlini_wagner_l2 \
        --image example.png
By running the example file example/torch_cw_example.py, you will get the following output.

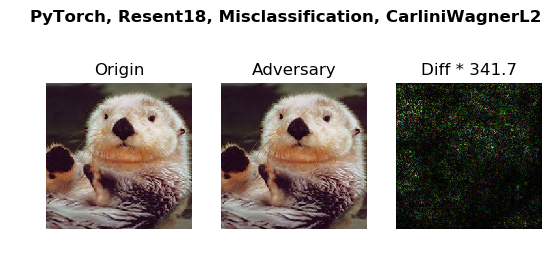
Above example shows that it is easy to fool a well-tuned classifier by adding small pertubation to the target.
PyTorch: VGG11 - SaltAndPepper Noise
In this example, we choose a different model and metric from above example. The detailed example file is at examples/torch_sp_example.py
from __future__ import absolute_import
import torch
import torchvision.models as models
import numpy as np
from perceptron.models.classification.pytorch import PyTorchModel
from perceptron.utils.image import imagenet_example
from perceptron.benchmarks.salt_pepper import SaltAndPepperNoiseMetric
from perceptron.utils.criteria.classification import Misclassification

# instantiate the model
vgg11 = models.vgg11(pretrained=True).eval()
if torch.cuda.is_available():
    vgg11 = vgg11.cuda()

# initialize the PyTorchModel
mean = np.array([0.485, 0.456, 0.406]).reshape((3, 1, 1))
std = np.array([0.229, 0.224, 0.225]).reshape((3, 1, 1))
fmodel = PyTorchModel(
    vgg11, bounds=(0, 1), num_classes=1000, preprocessing=(mean, std))

# get source image
image, _ = imagenet_example(data_format='channels_first')
image = image / 255.  # because our model expects values in [0, 1]

# set the label as the predicted one
true_label = np.argmax(fmodel.predictions(image))
# set the type of noise which will used to generate the adversarial examples
metric = SaltAndPepperNoiseMetric(fmodel, criterion=Misclassification())
adversary = metric(image, true_label, unpack=False) # set 'unpack' as false so we can access the detailed info of adversary
The corresponding command line is
python perceptron/launcher.py \
        --framework pytorch \
        --model vgg11 \
        --criteria misclassification \
        --metric salt_and_pepper_noise \
        --image example.png
By running the example file example/torch_sp_example.py, you will get the following output:

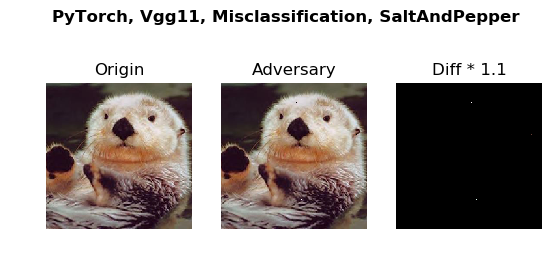
The model VGG11 does not produce the correct prediction at the beginning. By revising only two pixels, we are able to fool the classifier to make another wrong prediction.
PyTorch: ResNet18 - Brightness Verification
This example verifies the robustness of ResNet18 model against brightness variations, and it will give a verifiable bound. The detailed example file is at examples/torch_br_example.py
from __future__ import absolute_import

import torch
import torchvision.models as models
import numpy as np
from perceptron.models.classification.pytorch import PyTorchModel
from perceptron.utils.image import imagenet_example
from perceptron.benchmarks.brightness import BrightnessMetric
from perceptron.utils.criteria.classification import Misclassification

# instantiate the model
resnet18 = models.resnet18(pretrained=True).eval()
if torch.cuda.is_available():
    resnet18 = resnet18.cuda()

# initialize the PyTorchModel
mean = np.array([0.485, 0.456, 0.406]).reshape((3, 1, 1))
std = np.array([0.229, 0.224, 0.225]).reshape((3, 1, 1))
fmodel = PyTorchModel(
    resnet18, bounds=(0, 1), num_classes=1000, preprocessing=(mean, std))

# get source image and print the predicted label
image, _ = imagenet_example(data_format='channels_first')
image = image / 255.  # because our model expects values in [0, 1]

# set the type of noise which will used to generate the adversarial examples
metric = BrightnessMetric(fmodel, criterion=Misclassification())

# set the label as the predicted one
label = np.argmax(fmodel.predictions(image))

adversary = metric(image, label, unpack=False, verify=True)  # set 'unpack' as false so we can access the detailed info of adversary
The corresponding command line is
python perceptron/launcher.py \
        --framework pytorch \
        --model resnet18 \
        --criteria misclassification \
        --metric brightness --verify\
        --image example.png
By running the example file example/torch_sp_example.py, you will get the following output:


In above figure, we only show the adversarial exampe when we increase the brightness. Let \((L, U)\) denotes the verifiable bound. The value \((L)\) (resp. \(U\)) means if we want to increase (resp. decrease) the brightness to generate adversary example, the minimal brightness pertubation we need is \((L)\) (resp. \(U\)). (Note: brightness pertubation \(L\) means multiplying each pixel in the image with value \(L\))
Caution: when using the verifiable metric, if the parameter verify is not set to True, the program will just slice the search space according to the epsilon value, not the minimal step the verifiable metric requires. Hence, the output verifiable bound has a wider range than the actual verifiable bound.
Cloud Framework
Cloud API: Google SafeSearch - Spatial Benchmarking
This example benchmarks the robustness of the SafeSearch API provided by Google cloud AI platform against spatial transformation attacks by attack by measuring the minimal required pixel-wise shift for a spatial attack to success.
from __future__ import absolute_import
from perceptron.utils.image import imagenet_example, load_image
from perceptron.models.classification.cloud import GoogleSafeSearchModel
from perceptron.benchmarks.contrast_reduction import ContrastReductionMetric
from perceptron.utils.criteria.classification import MisclassificationSafeSearch
import numpy as np
from perceptron.utils.tools import plot_image
from perceptron.utils.tools import bcolors


# before running the example, please set the variable GOOGLE_APPLICATION_CREDENTIALS as follows
# export GOOGLE_APPLICATION_CREDENTIALS="[PATH]"
# replace [PATH] with the file path of the JSON file that contains your service account key
# For more details, please refer to https://cloud.google.com/docs/authentication/getting-started#auth-cloud-implicit-python

model = GoogleSafeSearchModel()

# get source image and label
image = load_image(dtype=np.uint8, fname='porn.jpeg')
metric = ContrastReductionMetric(model, criterion=MisclassificationSafeSearch())
adversary = metric(image, epsilons=10, unpack=False)
The corresponding command line is
python perceptron/launcher.py \
        --framework cloud \
        --model google_safesearch \
        --criteria misclassification_safesearch \
        --metric contrast_reduction \
        --image porn.jpeg
Run the corresponding example file examples/safesearch_noise_example.py The information printed on the screen is:

Note: For each cloud model, we have a specific criterion. Here the criterion for Google Safesearch is misclassification_safesearcha.